Recently I had to build and deploy a private NuGet server. The official documentation is quite good, but I did hit some (admittedly small) hitches along the way, so I thought I might as well share the whole process. Hopefully this post will be helpful to the next guy or gal adventuring down the same path.
If I don’t need to convince you on the usefulness and importance of packages in modern software development, then you can safely jump to The case for private NuGet feeds, and spare yourself some of my ramblings.
Why you should package
Before I get down to business allow me a little digression to stress the importance of packaging, even for small teams. Packaging is not new. The practice is considered to be well settled, even in the .NET community where it became mainstream in relatively recent times with the advent of NuGet (2010). Nonetheless, I have seen the discussion going oh so many times, even in recent times, in shops big and small: should we package in the first place? Yes you should.
You don’t want to just get along with loose .dll files being distributed (zipped or not) by hand, email, or any other means. We have all done it at some point or another. Over time even that single, very simple, self-contained library file is going to outgrow itself. New releases will happen. Some of those releases might happen to be outright broken. Bugs and/or regressions will surface. They always do. Maybe your library will take on a few dependencies. Good luck getting all your peers to upgrade or downgrade painlessly.
And yes I know. Nowadays we have version control systems. A team can simply share code via git. But often times you don’t necessarily want/can share the code with your colleagues. More importantly, in most scenarios your peers only need the features that your library offers, not the burden that comes with adding your project to their solution and then keeping their clones up to date. They simply need to add a reference to your library. It might make sense to keep everything fluid (no release, no package) at the very early stages, when your API is not ironed out yet but really, just don’t. Especially so if you can rely on a private NuGet feed which you can setup to allow for all kind of dirty (and inadvisable) tricks, like enabling package overwriting which is disabled on the public feed.
Packages are the way to go. They give you versioning and dependency management. They also encorage a distribution model made of small, mostly self-contained files, which is both a best and common pattern (just look at the path taken by Microsoft itself with the .NET Core distribution model).
The case for private NuGet feeds
Now, with that out of the way, let’s give a look at the official NuGet feed. According to the NuGet blog itself:
NuGet.org is growing blazingly fast. The past couple of years have seen a tremendous growth in the usage of packages from the NuGet gallery.
But let’s just dig into that giant haystack for a little while. Just a quick glance will suffice to determine that the feed is a big mess. Besides the top packages, the tip of the iceberg, you will easily spot a whole lot of packages that are clearly intended to be only consumed by a handful of people. Descriptions are often very short, to the point of being unintelligible. Sometimes they are totally (purposely?) cryptic, or just speak some kind of internal lingo. Heck, even the package names are at times so obscure that I don’t even get a hint at what they are supposed to do.
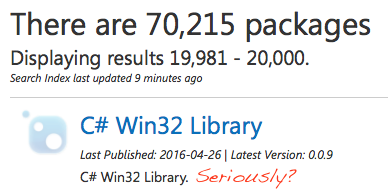
Mind you, this is not limited to the NuGet ecosystem. If we look at the Python Package Index for example, we find the same exact situation: 95K+ packages, many of which are totally unintelligible unless you know what you are looking for. And don’t get me started with npm, which reigns supreme with its astounding 350,000 packages count.
I cannot help but think that many packages would better sit in a private NuGet server. I would not be surprised to learn one day that people are publishing to the public feed just because they don’t know they can build their own private server or, even if they do, they think it is just not worth the effort.
Private servers are not a tool just for the enterprise. Small teams will benefit from them too. Aside from the obvious we don’t want/can’t share our packages with the public there are other good reasons to have one. Setting a server up is cheap (host on IIS or Azure), easy, and allows you total control over the feed.
Private NuGet feed options
The NuGet framework supports local feeds with three options:
- Local feed. This is a suitable network file share used to store your pages. Very simple. Probably a good solution if you don’t need to share your packages outside your LAN.
- NuGet.Server. Packages are made available through a HTTP server, local or remote.
- NuGet Gallery. Packages are hosted using the NuGet Gallery Project available on GitHub. This is the same tool used to host the official feed, with all the features like web browsing and searching, admin interface, etc.
There are also third-party NuGet hosting services that support remote private feeds.
In this article we will look at NuGet.Server option. This is an actual
package provided by the .NET Foundation. It creates an ASP.NET application that
can host a package feed on any server that runs IIS. It is simple and quick to
setup, and it is ideal for small teams and simple scenarios. Its biggest
drawback is that it does not keep state: it does not rely on a local database
to store download counts, user logins, etc. If you need that level of detail then you want to
look at the NuGet Gallery option. What the NuGet.Server packages does, in
practice, is making a folder on the server available through HTTP(S). Visual
Studio and nuget.exe can then add the server to the list of available
sources and consume it along with other feeds, like the public one.
If you played with NuGet.Server in the past and found it slow for large number of packets, please give it another shot now. Besides some internal optimizations, in recent times it has been updated to use the Expanded Folder Format and its performance has skyrocketed since then.
Create a NuGet Server in Visual Studio
In Visual Studio select File > New > Project to create a new project. In order to get the latest version of NuGet.Server, make sure you set the target framework to .NET Framework 4.6 or above.
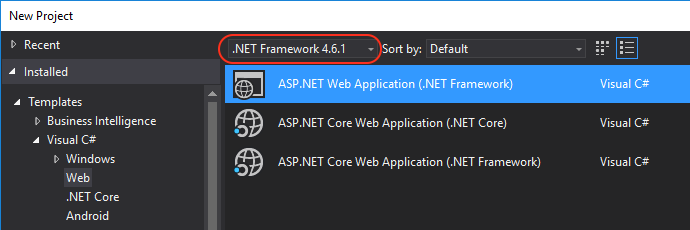
Give the application an appropriate name and click OK. In the following dialog pick the Empty ASP.NET Web Application template and click OK.
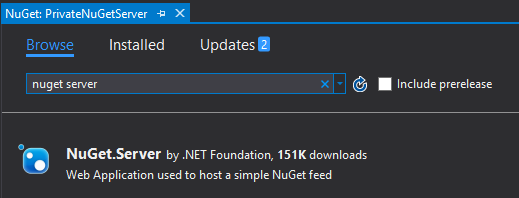
Next you need to install the NuGet.Server package itself. Right-click the project name and select Manage NuGet Packages. In the NuGet Package Manager search and install the latest version of NuGet.Server.
Alternatively, you can of course install from the Package Manager Console with
Install-Package NuGet.Server.
The installation process will install the needed dependencies and take care of
converting your empty application into an actual package server. It achieves
that by overwriting the default web.config to include custom application
settings (to which we will get in a second), and by creating a deafult
Packages folder where your packages will reside. When you are asked if you
want to overwrite the current web.config, say YES.
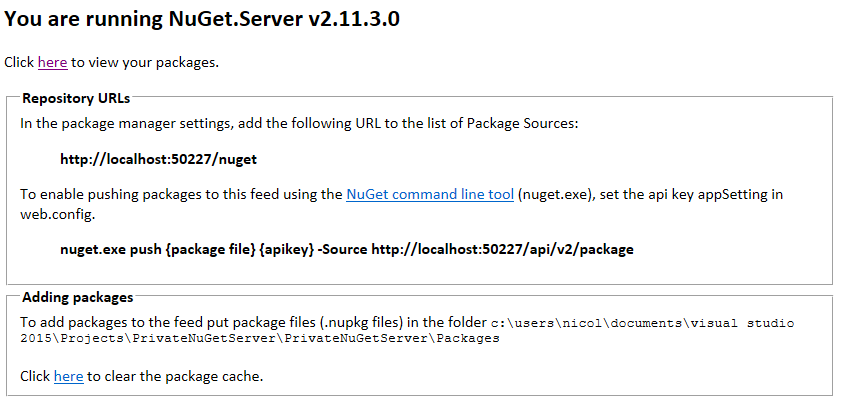
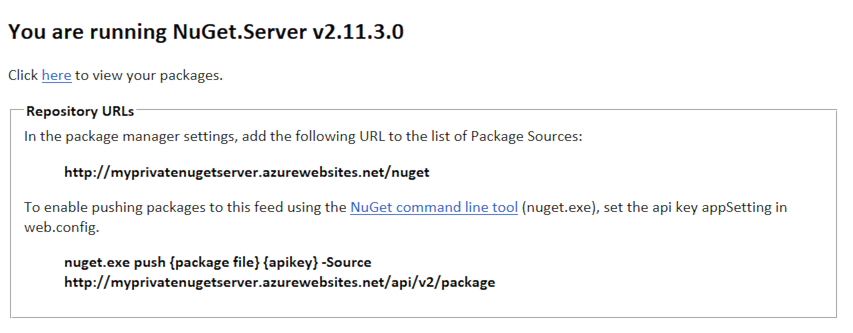
When the process is complete your server is ready to run. Just hit Ctrl+F5 (no debug) and Edge will fire up at the following page:
Adding packages to the feed
Now, if you go back to the project and inspect the newly created Packages
folder, you will find that it is empty except for a readme file, which
makes sense since we have not added any package to our repository yet. The readme
says that you can simply drag (or paste) your .nupkg files into the folder in
order to make them available to clients.
That works. I suspect, though, that it used to work better back when
NuGet Server did not support the Expanded Folder Format. At the time of this
writing (v2.11.3 of the package), dragging packages is an awkward process for
a couple of reasons. First, you also need to remember to set the Copy to Output
Directory property to Copy Always for every file added this way (that’s not
mentioned in the readme). Second, as soon as the app is up and runnig it will
reconstruct the folder by moving package files, each one into their own
sub-folder, as the Expanded Folder Format implies. This will leave your project
with orphaned files. My suggestion is to simply use your newly created server
the way it is supposed to be: just push your packages to it via nuget.exe.
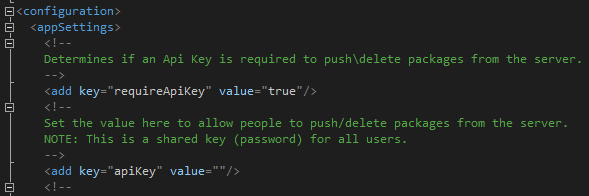
Initially your NuGet Server will not allow clients to push packages. You first
need to set an API key in web.config, then clients will need to use the key
when pushing to the server. As you can see, the apiKey value is blank by
default.
The key will have to be shared by all clients, so make sure you hand it only to authorized personnel. While you are at it, also make sure that it as strong as it can get. And yes I agree. Along with being statless, the shared API key requirement is probably the biggest drawback to the NuGet.Server option.
If your server is secured by other means (e.g. it sits in a firewalled
company network), or if you just want to perform some local testing, you can
switch the API key requirement off by setting requireApiKey to false.
Once your API key is properly configured you can start pushing from the command line:
nuget.exe push {package file} {apikey} -Source http://localhost:50227/api/v2/package
As you can see are still running on localhost. It’s almost time to publish our
NuGet server to IIS or Azure. Let’s first give a look at a couple interesting
options we have in web.config.
Allow overriding on Push
As I mentioned in my ramblings above, a private feed offers some more
control over the feed compared to the public one. On nuget.org you cannot override an
existing package version, period. On you own server you have to option to allow
that. Just set allowOverrideExistingPackageOnPush to true (it is disabled by
default, and for good reasons).
Soft deletes (delist)
When a client has a valid API key it can not only push, but also delete
packages. By default the delete command will do just that, delete the package
file from the repository. On your server you can change that behavior and opt
for delisting on delete instead. Just set enableDelisting to true.
Be careful however as a delisted package can still be donwloaded by clients that explictly specify the version, as correctly reported in the comments for the option.
Change the default folder
If you dislike ~/Packages as your packages repository, you can set
packagesPath to something other than the default blamk value. This can be
a virtual or physical path.
Deploy to IIS or Azure
There is nothing special about deploying the server application to either IIS or Azure. It is just a normal web application and we can leverage Visual Studio’s Web Deploy feature to achieve our goal.
In the Solution Explorer right click on the project name and hit Publish. In the Publish dialog, if you are publishing to Azure select Microsoft App Service. Sign-if if you need to, and then pick an appropriate service name.

Hit Publish. At the end of the process Edge will open your remote welcome page.
You can start to push packages right away.
If publishing to IIS in the Publish dialog select the Custom option and fill in server name (IP address works too), site name, username and password. The Destination URL is not strictly necessary. When I first tried this, pushes were failing despite the server app being up and running. The issue was that the application did not have write access to the Packages folder, so you might want to check that too.
Consume the feed from Visual Studio
Once your server is up and running you can add it as a NuGet Source in Visual Studio. Go to Tools > Options and browse to NuGet Package Manager > Package Sources. Alternatively, right click on the project in the Solution Explorer, hit Manage NuGet Packages and then hit the gear icon next to the Package Source combo.
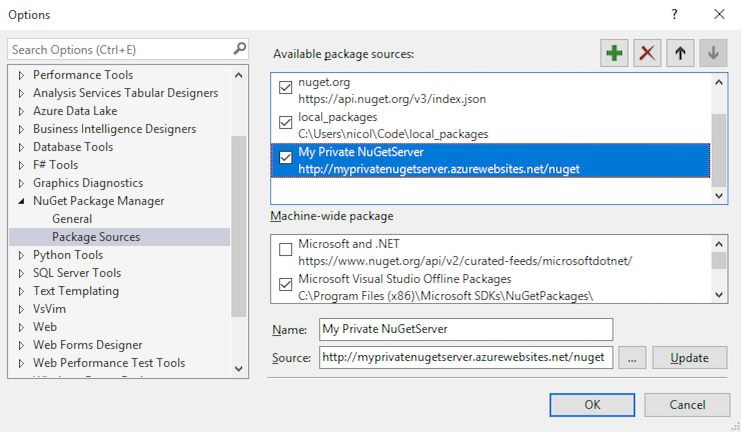
Add your server to the list of available sources. As you can see in my case I have nuget.org, a local folder and the test server for this article available. Hit OK once your server has been added. At this point when you go to the NuGet Package Manager window your Package source combo will also list your private server and you can install packages from there.
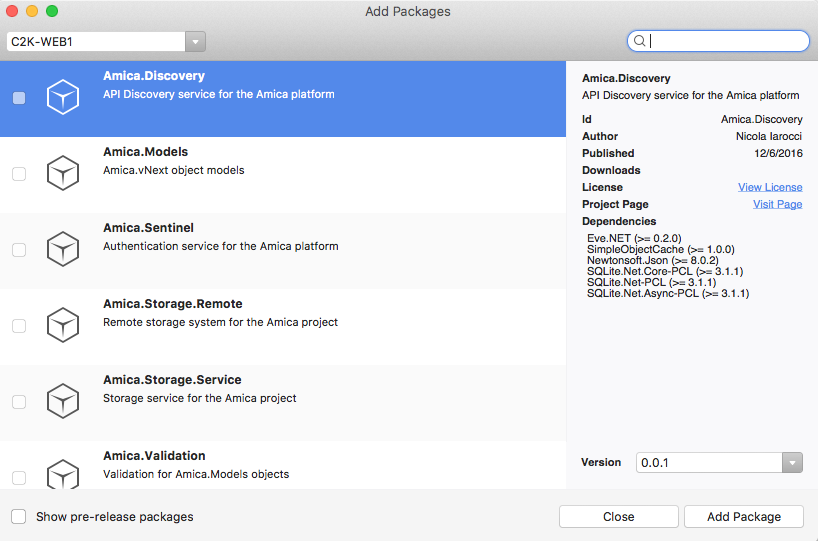
The screenshot above is from Visual Studio for Mac. It shows the actual private feed we use for development. All our packages are nicely listed there, with no interference from the public feed. The public feed is only one click away and, both on Mac and Windows, you can search on all available feeds at once, wich is super convenient.
Wrap up
NuGet.Server makes setting up a private NuGet feed a breeze. It does have a few drawbacks. If you can live with it being stateless and not allowing for individual API keys, then this package is probably your best option. The full NuGet Gallery project is still available if you need more power.
If you want to get in touch, I am @nicolaiarocci on Twitter.
Special thanks to fellow Microsft MVP & Regional Director Andrea Saltarello for peer reviewing this article before publication.